Thursday, January 24, 2013

2D and 3D Figures Book

With 8th grade, Two-dimensional and Three-dimensional figures are review, so I spend two days going over both topics.  In the past, I have done the normal... take notes in a graphic organizer. This year, I decided to go with a hands on approach.  I created a book in which the kids will review all concepts about 2D and 3D figures.  We have worked on this the past two days, and it has been GREAT!

For this week, I have my desks set up in groups of 4 for cooperative learning.  I have 3 instruction sheets per group. They include:

  • Details of what should be on each page of the book
  • Details  for 2D figures
  • Details for 3D figures


I gave each student 5 pieces of paper that they used to create a booklet.  They also received a set of 2D figures, and on the second day, I gave them the 3D figures.

2D Figures Section:


  • Write the name on the figure
  • Under the figure write:
  • –Congruent sides
  • –Types of Angles
  • –Total # degrees d = 180(n-2) n is the # of sides
  • –Formula for Area
  • –Formula for Perimeter or Circumference
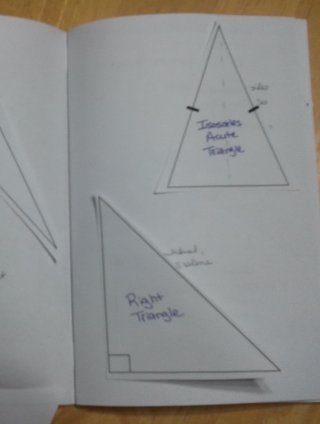


With this section, we spent about 10 minutes with a full class discussion over how to find the congruent sides, classify angles, and calculate the degrees.  We also discussed how to find perimeter when a formula is not given.  I gave everyone a formula chart, so they were able to refer to that for the area calculations.  We talked about how to find the area of pentagons, hexagons, etc.  With an illustration on the SMARTboard, the kids were able to see how to find these.  Complex figures can be tricky!!!

It nevers fails to amaze me that although these kids are in 8th grade, some of them have forgotten some if not all these facts.

3D Figures Section:


  • Cut the figure out and tape one side to the paper.
  • Write the name on the figure.
  • Under the figure, write:
  • •Name of base (all have a base except one)
  • •Number of edges (if any)
  • •Number of vertices (if any)
  • •Shape and number of


With this section we spent about 5 minutes with a full class discussion over the difference between prisms and pyramids.  We discussed that the base is not always what the figure is sitting on.

Throughout both days, I walked around the room talking with each group. I told them to raise their hand before they shaded in the bases to make sure they were correct.

Of course, since the first day of school, I have talked to them about how to ask a question.  NEVER just say, "how do I do this" or "I don't know".  Once they begin with what they do know and what they think they should do, I am there to ask them questions which helps them arrive at the answer.  When they find the answer, it always provides for better understanding.

Tomorrow, we are reviewing over nets, so they will be adding in measurements and characteristics on the last few pages of their book.

Over the next few weeks, we will go over Volume and Surface Area, so I have a 3d figures part 2.  In this section, we will go back and add the formulas for each figure.

I am very pleased with how this turned out!  I am glad that I turned this into a hands-on activity.

Go to my store to get the full activity complete with figures!

Happy Figure Reviewing!

Tuesday, January 22, 2013

All About Circles

I created this activity my first year teaching.  It has been one that I have shelved for the last few years, but I am dusting it off and bringing it back.  I even made a few changes.

In class this week, I am really hitting the cooperative learning aspect.  I have arranged my desks in groups of 4, so the entire class period will be spent with a group.  I hope they will be able to take away that group work is not about one person doing the work.  It is about being there to help someone else out.

With 8th grade, we do a quick review over 2d figures.  With this, I include a review over circles. With each group of desks, I have placed these items in a storage box:

  • scissors
  • bottle of glue
  • roll of tape
  • crayons or map colors
  • ruler


Each group will have an information sheet (one for the group), that details the parts of a circle.  They will each use a paper plate to create the same circle.  Each person will be responsible for his/her own circle.  Here are the materials:

  • paper plate
  • plastic straws
  • yarn 
  • glitter
I will manage these supplies and distribute as needed.  I don't like to waste, so these kids will learn how to recyle the left over glitter!

The students will follow these steps:

  • Outline the smaller circle within the plate
  • Use glitter to illustrate each radius (there are three)
  • Use a straw to illustrate the diameter
  • Use yarn to illustrate the chords
  • Shade each central angle one color
  • Shade the inscribed angle one color
  • Label the points


Of course, the diameter will have a straw, glitter and yarn.  In my example, I have them placed on top of each other to show each one.  On the back of the plate, they will create a key.  We will hang a few of them from the ceiling.  On Thursday, they will create a 3d mobile, as well, so my ceiling is about to leak geometry!

Go to my Store for the FREE downloadable activity.

I think the kids will enjoy the hands on activity, and I believe the parts of a circle will sink in a little more than if they just wrote it on paper.

They will also be modeling solids with blocks and beginning the 2d/3d book (I will post this tomorrow).  They are going to be busy little cubs tomorrow, but I find many of them work much better knowing they have a lot to do.

Happy circling!!

Monday, January 14, 2013

Cootie Catchers AKA fortune Tellers

How many of you remember making cootie catchers or fortune tellers as a kid?  I remember making a ton of them!  I decided to bring the concept into my classroom.

Identifying which equation could be used to solve a problem is a weak area.  In today's lesson, I had the kids answer 10 multiple choice problems out of Motivation Math.  All of the problems I selected asked them to find which equation could be used to solve the problem.  Here is what I had them do:

  • Read the problem
  • Analyze the problem (find the facts)
  • Solve the problem
  • Write the equation (the solution to the problem) 
  • If necessary, use a calculator and determine if the equation selected is reasonable.
  • Create another problem in which the same equations would need to be used.


The last part created a lot of discussion with many of the kids.  We went through this example as a class.
I can make $8 per hour babysitting.  If I work15 hours, which equation could be used to find t, the total amount of money earned?
a.  t = 15/8
b.  t = 8(15)
c.  t = 8/15
d.  t = 8+15
We agreed that equation b is what we would need.  I told them that they needed to create a brand new problem in which the equation, t = 8(15) would be used.  We came up with this.
There are 8 students in the class.  Each student has 15 pencils.  How many pencils are there in all?  Once we did this, a lightbulb went off for many of them.

Okay, now here is where the cootie catchers come into play.  I gave all the kids a white piece of paper in which I trimmed off the excess to make it a square (a big paper cutter is a time saver for this).
Here are the steps to make it:

  • Fold the paper and create a diagonal.
  • Unfold
  • Fold the paper again and create the other diagonal.
  • Unfold
  • Take each corner and fold it where the end meets the center of the paper.  Do this for all four corners.
  • Turn the paper over.
  • Take each corner and fold it where the end meets the center of the paper.  Do this for all four corners.
  • On the side with the squares, we put colors.  Some of the kids got creative and used highlighters, etc.
  • On each of the 8 triangles, we wrote the page number and problem to one of the problems I had assigned.  I assigned 10, so they chose 8.
  • Under the problem number flap, the kids wrote the equation they believe can be used to solve the problem.

We will finish this assignment up tomorrow.  I will have the kids go around the room with the cootie catcher they created, and they will play the game.  They will get to see if the equation they selected is the same as the other person.  If it is not, they will have a discussion as to why they selected the equation.
Outside part of the cootie catcher
Page number and problems listed on each triangle


Equation that can be used to solve the problem

The kids were really excited about making these.  Many of them had made them before and could not believe we were doing this in the math class.  They are anxious to go around the room tomorrow and actually play.

I am in the process of making some that can be used for measurement, formulas, etc.  That will be another post!

Happy Cootie Catching!

Thursday, January 10, 2013

FACEing Math

At a math conference two years ago, I came upon the booth FACEing Math.  The concept is to use problems and create a particular face.  Problems are designed for various topics and grade levels.  You give the students a paper with the intial outline of the head and a sheet with the problems.  If the answer is a, then they draw this.  If the answer is b, then they draw that.  There is even a book without problems, so you could design your own.

The kids really enjoy doing these.  I use these in math stations, and I also leave them when a substitute will be there.  A picture of what the finished product should look like, is also included in the book.  The kids are able to look at the correct picture and see where the mistakes (if any) were made.  Although, all of the faces should somewhat resemble the same thing, they are all still different.

We lost our art class this year, so I have tried to incorporate as much drawing, coloring, etc as I can.  Even though I teach 8th grade, the majority of them love to color!  It is fun to watch them try and sketch out some of the aspects.  I show them what my sketches look like, so they don't feel so bad!  An artist I am NOT!!!

Here is an example of what the sheet with the problems looks like.
This student highlighted the choice of the answer she selected.

When I left this for the sub, I only printed the first page.  There should have been two.  I am not really sure what happened there.  If I had printed the other page, all the colors would have been the same.  Since, I left it off, the kids chose what color they wanted to use.

Here are a few of the ones that are hanging up in the hall.
As you can tell, this one was an Egyptian face.

You can find more information about using FACEing math at her website:  http://www.faceingmath.com/facingmath/Main.html

I hope you are able to incorporate this into your classroom.  The kids really do enjoy it!

Happy FACEing!

Tuesday, January 8, 2013

Reindeer Activity

Wow!  The school year is flying by.  Do you dislike early release days?  Those are the most difficult days in which to keep the kids busy and in line!

A few years ago, I came up with this math reindeer activity.  I do this on the early release before Christmas break.  Of course, this project can be used at any time.  This project incorporates a hands-on activity with Pythagorean Theorem, sequences, expressions, and measurement (diameter and length).  I have questions for the kids to answer, but I am really just happy to make it through the day.  I take up the work, but it is one of those things that if they don't finish or if someone is absent, oh well.  


Items Needed:
            2 Popsicle sticks                                        Glue
            2 Pipe cleaners                                          Scissors
            1 sheet black construction paper                Ruler
            1 sheet red construction paper
            1 sheet white paper

Teacher’s Note: 
The jumbo Popsicle sticks allow for a wider faced reindeer, but regular Popsicle sticks work just fine. 
To glue the Popsicle sticks together, hot glue is the fastest way.  Hot glue is also useful when gluing the pipe cleaners to the sticks.  For safety, it is best for the teacher to operate the glue gun.  Remind the students that the reason it is called hot glue is because the glue is hot.  A helpful tool is the eraser on the pencil to push the items down once the hot glue is in place.
A time saver is to have stacks of white, red and black construction paper already cut.  Since the students will only need a small amount of paper, a regular piece of paper can get 8-10 square pieces of paper.
If perfect circles are desired (and time allows), a compass will be needed.  If a compass is not used, approximation is needed; therefore, all circles will be slightly unique.
The back of the information sheet is a great place to answer the questions.
For step 12, the glue, scissors and ruler may or may not be included in the # of items needed.  This may be specified or left to the student’s discretion.
Play some Christmas music to set the tone, and the students are able to leave the room with a great present for a loved one!

Reindeer created by a student

You can go to my tpt store for a student information sheet that is ready to be passed out.  

I know Christmas has already come and gone, but you can make a reindeer any time of the year!!

Happy Reindeer making!

Wednesday, November 28, 2012

Let the Voting Begin

The student created songs have been posted to our class facebook page.
Mrs-Cooks-8th-Grade-Math-Class-Going-Beyond-the-School

Here is the song that is currently in the lead!


Go to our facebook page and cast your vote!

I recorded the voices of the kids singing the songs.  The song with the most likes will win!  The kids are excited that other people can vote on their work!  It is also a great way to get the parents involved.

Our big project this six weeks is for the kids to work with a partner to create a song that teaches a concept. I have done this every year, and I usually get some really good ones.  They can pre-record it or present it live.  With the addition of the facebook page, I am planning on posting the best videos there.  We will have another voting session.  Of course, I will make sure the kids are able to have their picture or video posted.

I really think projects like this help with public speaking.  The kids have already had to present many times as a small group.  Now, we will see how they do with a partner.  They should take away some great skills to be used now and in the future!

Don't forget to go our facebook and like your favorite song!

Happy voting!


Thursday, November 15, 2012

Student Created Songs

Since the beginning of school, I have been writing songs to teach different concepts.  I have created songs for:
Dilations
Scale Factor
Tax, Discount and other Percent Apps
Fraction, Decimal and Percent equivalencies
Translations

Last week, I told my classes that they were now responsible for creating an original song that teaches Scientific Notation.  Since I have my classes in houses, each house had to create a song.

The songs were due today, and I was pretty impressed!  I always have my kids do a sing a long with a partner, but this is the first year I have given them songs I have created!  I think by allowing them to see how my songs teach a concept, they were able to create a pretty good song.  I wish I could say that all of them were great, but some were not!  I hope they use this as a learning tool and are able to create better songs as the year progresses.  I really believe that the sing along projects with a partner will be MUCH better this year!

One girl told me that she is not as nervous any more when she gets up in front the class.  I really think this is helping develop good public speaking skills, as well.  The first step in public speaking is to not be nervous in front of a group.

I told the kids that I would select the best song to add to our song portfolio.  I have two songs from my first class, one from my second and one from my last class that are in the running.  I think I am going to record them singing the songs.  I only want their voices (for now).  The performance factor will come in later!  I am thinking about posting them on my class facebook page for people to vote on the best song.  I only use the facebook page to post questions that the kids have created.  I believe this would be a good thing to add, as well.  I can see them working hard to get their song chosen.

It has been a busy year, so far!  I am really ready for Thanksgiving break!

Happy Singing!